3 R Project
Throughout this book, we will use an R Project as the central workspace unit. An R Project provides a unified location where all relevant materials—such as R scripts (.R files) and data sets—are organized and managed. While there are various ways to structure your projects, I recommend creating a single R Project for each collection of scripts and data that contribute to a specific publication.
3.1 Setup R Project
To set up an R Project, open RStudio and follow the procedure outlined below:
- Go to
File > New Projecton the top menu - Select
New Directory - Select
New Project
A new window will appear, prompting you to name a directory and select a location on your computer. To choose a location for the directory, click on the ‘Browse’ button. When organizing your project directories on your computer, I highly recommend creating a dedicated space. For instance, on my computer, I have a folder named github/ where I store all my R Project directories.
Now, go to the R Project folder you created, and double-click on .Rproj file. You will encounter the interface depicted in Figure 3.1. Initially, the interface comprises three primary panels: Console, Environment, and Files.
Console is where you execute calculations, data manipulation, and analysis by running codes. Environment panel lists the saved objects, while the Files panel displays files in a designated location on your computer.
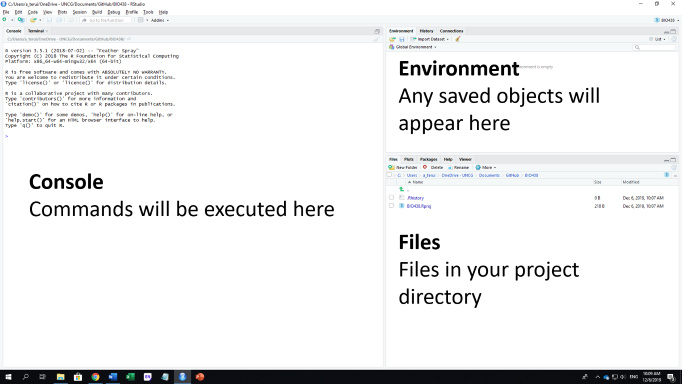
Figure 3.1: RStudio interface.
Let’s play a little bit in the console to see what happens. After pasting the script into the console, you will notice that the variable x appears in the environment panel.
x <- 1x is an object that assigns information. In this particular case, we have assigned 1 to the object x. Once you have assigned information in x, you can access it by simply typing x.
x## [1] 1Excellent! Let’s try the following simple exercise to get used to it:
Create object
yand assign2to it.Create object
zeroand assign0to it.
3.2 Script Editor
While you can type your code directly into the console, this approach is generally considered poor practice. As your project grows, the complexity increases, often leading to the accumulation of substantial material—potentially exceeding 2,000 lines of code in a single project. Managing and revisiting code written directly in the console quickly becomes unwieldy and inefficient.
It is highly recommended to manage your scripts in the Editor instead. The Editor is where you draft and fine-tune your code before executing it in Console. To create space for the Editor, press Ctrl + Shift + N. A new panel will appear in the top left corner. Type the following script in the Editor (note that the key combination Ctrl + Shift + N assumes a Windows or Linux operating system. If you’re using a Mac, you can use Command + Shift + N instead).
y <- 5Then, hit Ctr + S to save the Editor file. RStudio will prompt you to enter the file name of the Editor1 and where to save it as .R file.
3.3 File Name
It is also crucial to establish consistent naming rules for your files. As your project progresses, the number of files within each sub-directory may increase significantly. Without clear and consistent naming rules for your files, navigating through the project can become challenging, not only for yourself but also for others involved. To alleviate this issue, consider implementing the following recommendations for file naming:
-
NO SPACE. Use underscore.
- Do:
script_week1.R - Don’t:
script week1.R
- Do:
-
NO UPPERCASE. Use lowercase for file names.
- Do:
script_week1.R - Don’t:
Script_week1.R
- Do:
-
BE CONSISTENT. Apply consistent naming rules within a project.
- Do: R scripts for figures always start with a common prefix, e.g.,
figure_XXX.Rfigure_YYY.R(XXXandYYYspecifies further details). - Don’t: R scripts for figures start with random text, e.g.,
XXX_fig.R,Figure_Y2.R,plotB.R.
- Do: R scripts for figures always start with a common prefix, e.g.,
3.4 Structure Your Project
The internal structure of an R Project is crucial for effective navigation and ensures clarity for both yourself and others when it is published. An R Project typically consists of various file types, such as .R, .csv, .rds, .Rmd, and others. Without an organized arrangement of these files, there is a high probability of encountering significant coding errors. Therefore, I place great importance on maintaining a well-structured project. In Table 3.1, I present my recommended subdirectory structure.
| Name | Content |
|---|---|
README.md |
Markdown file explaining contents in the R Project. Can be derived from README.Rmd. |
code/ |
Sub-directory for R scripts (.R). |
data_raw/ |
Sub-directory for raw data before data manipulation (.csv or other formats). Files in this sub-directory MUST NOT be modified unless there are changes to raw data entries. |
data_fmt/ |
Sub-directory for formatted data (.csv, .rds, or other formats). |
output/ |
Sub-directory for result outputs (.csv, .rds, or other formats). This may include statistical estimates from linear regression models etc. |
rmd/ |
(Optional) Sub-directory for Rmarkdown files (.Rmd). Rmarkdown allows seamless integration of R scripts and text. |
3.5 Robust coding
While it is not mandatory, I highly recommend using RStudio in conjunction with Git and GitHub. Coding is inherently prone to errors, and even the most skilled programmers make mistakes – without exception. However, the crucial difference between beginner and advanced programmers lies in their ability to develop robust coding practices accompanied by a self-error-detection system. Git plays a vital role in this process. Throughout this book, I will occasionally delve into the importance of Git and its usage.